How to Add Your Custom Location on Instagram Easily?
Do you know? The posts that are tagged with location have 79% more engagement than a post that has no location tag. Social media is much faster than news media that helps people to grasp any information around the world in microseconds.
So adding your location in every post on Instagram is an added advantage, especially if you are a business person. It helps you to promote your own business or your favorite place, food, shop, etc., and helps people to find your location when they search you on Instagram. People too happily tag or pin the place in their post.
Are you wondering, how to add the location on Instagram? Read this article to learn easily.
To add the location on Instagram, firstly, it is required to add it on Facebook. As we all know Facebook-owned Instagram back in 2012, so they operate with the same system.
STEP-1
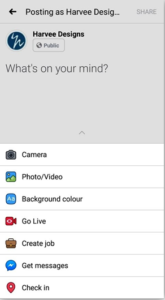
- Now, login to your Facebook and click to add your post (What’s on your mind). You could find “Check in” in the category below.
STEP-2
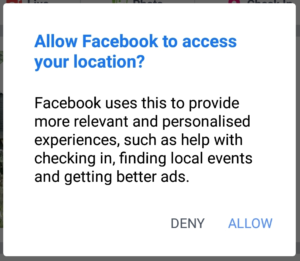
- Click “Check in” it would ask for location (“search for places, Find place near you, and TURN ON LOCATION SERVICES“). In addition, it suggests the recent location you have used.

STEP-3
- Make sure to click that button ” Turn on Location“. So, Facebook reads your location, If you are at the exact place.
STEP-4
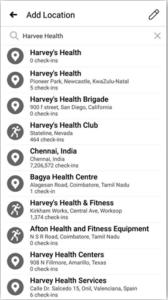
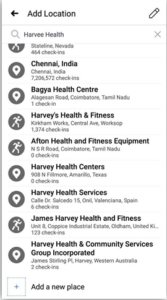
- After doing so, type the name of the location you want to tag. Example: It can be of anything (location name, business, shop, or any funny names).
STEP-5
- While you type, it shows all the available location, If Facebook shows the available location in the suggestion list. Then the location will be available on Instagram too. If you could not find, create one with a unique name.
STEP-6
- After typing the right name, click on to “Add a new place” mentioned below.
STEP-7
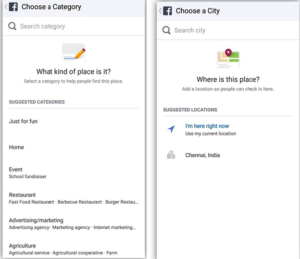
- Now a new window displays with a question “What kind of place is it“. Below that, you could find “SUGGESTED CATEGORIES“.
STEP-8
- You can choose the category of your choice. I have chosen “Web Designer” under advertising/marketing category.
STEP-9
- Once you have chosen, another window pops up “Where is this place” with a subtitle “SUGGESTED LOCATIONS“.
- Possibly, you could find an arrow with the tag “I’m here at the moment (Use my current location)“. Pick this if you are at the place right now.
- On the other hand, it shows a preferable location (Eg: Chennai, India).
STEP-10
- Choose or search the right location and get in.
STEP-11
- Now you can find the address and pinned location map if you have chosen (I’m here at the moment or preferable location (Eg: Chennai, Tamilnadu).
STEP-12
- Or you could find a section “Address” to fill the right address to guide the map (In this case, remove the check-in “I’m currently here”. Therefore, the map never gets confused with two different locations.

STEP-13
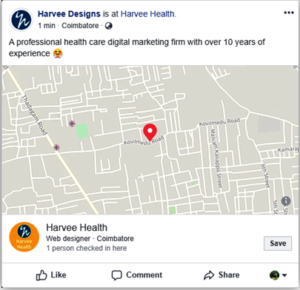
- Hope you are done; now tab the right side top button “create“. Great, your post is ready with the location; we named and added (“Harvee Health”).
STEP-14
- If you like to add more details to the post, proceed and share.

- If you click the location, we have created. Surprisingly, Facebook has already created a page according to our recommendations. You can use the location page to add more information relevant to it.
STEP-15
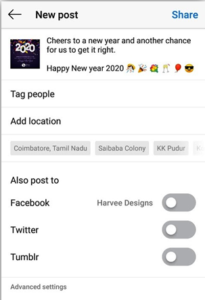
- Once you are done, go back to Instagram. Choose a media (Image/video/GIF) for posting, click on to add location.
STEP-16
- Search the location name, which you have added on Facebook. Awesome, the location name is in the suggestion list. Now pick the location and share your post.

- Your location added to the Instagram database, so you could able to retag or add the location to your post anytime.

Search
Recent Post


Categories
- AI in Healthcare
- Content Marketing
- Dental
- dental Digital Marketing
- Google Ads
- Google my business
- Healthcare marketing
- Healthcare SEO
- Internet Marketing Tips
- Lead Generation
- Local SEO
- Patient Satisfaction
- pay per click
- Pharma Marketing
- Social
- Social Media Marketing
- Traffic
- Website
- Website Designing
Contact
Get in Touch With Us
Coimbatore Address
- 21/1, Periasubbanna Gounder Street, K.K.Pudur, Coimbatore, Tamil Nadu 641038.
- 098942 76263
- info@harveehealthcare.com

Chennai Address
- RMZ Millenia Business Park, Level 6, Phase II, Campus 4B Unit 602A, Kandancavadi, Perungudi, Chennai, Tamil Nadu 600096.
- 098942 76263
- info@harveehealthcare.com

Dubai Address
- Umm Sequeim 3, Jumeirah Rd Opposite Burj Al Arab, Villa #1 855 A Dubai.
- info@harveehealthcare.com

United Kingdom Address
- 3/2 Powderhall Rigg Edinburgh, United Kingdom EH7 4GA.
- info@harveehealthcare.com

We are a digital marketing agency for healthcare, providing cost-effective solutions for hospitals, doctors, and dentists. As one of the leading digital healthcare marketing agencies, we specialize in Web Development, SEO, Pay-Per-Click Advertising, and Social Media Optimization. Our expertise in digital marketing for healthcare ensures effective strategies for growth. Contact us for the best digital marketing for hospitals and experience the impact of digital marketing in the healthcare industry.


Copyrights © 2025 harvee.co.uk

Leave a Reply